Big Data – MongoDb


Maybe lately you’ve heard about Big Data, but, what is Big Data? Big Data is a new way to store data. Common databases uses a Relational schema to store the data. Big Data databases use files to store the data like JSON data. This kind of data base is for a systems with a big amount of data that can increase a lot every day. In the examples we will see that the data manipulation is very fast.
There are some Databases of Big Data like RavenDB, Cassandra, HBase or MongoDB. We are going to use this last database. You can download it from his page (http://www.mongodb.org/).

After finish the installation we need to start the database. To start it, you need to go to the installation folder through cmd and launch “mongod” command.

1

Now we have the database running. I use the MongoVUE to manage mongoDB with a GUI (http://www.mongovue.com/). Is easier to see the data than through console.

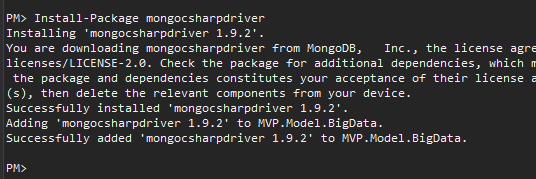
To start with our project, we need to install the libraries in our project. I have created a new project in our MVP project to put inside the MongoDB access and libraries.. Again we can do it through Nuget. In addition, we need to add in the UI projects the references or copy it in post-build events.

2

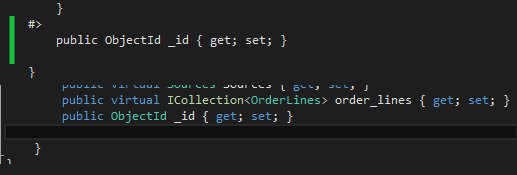
Ok, the first step is to “convert” our entities in MongoDB entities. That is easy. MongoDB, as other NoSQL databases uses a pair of key-value to store the data. This key is stored in a “_id” field, so we need to create this property in our Entities. To do that, we have modified the “.tt” file to add it when the entities are generated.

3

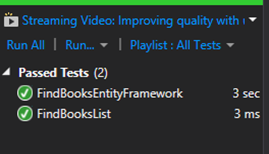
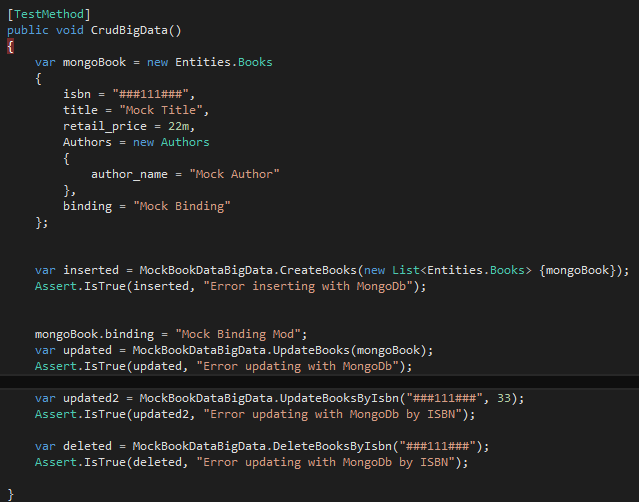
We have inserted some data to test it. We have inserted the data through Unit Tests, and in addition we have created test to show how to insert/update/delete data in MongoDB. We have created this methods in the class instead the interface because we only want to show how to do it. If all of our repositories needs to manipulate data, we should put it in the interface and implement it in all the classes that inherits from it.

4

8

To connect to MongoDB we need to specify the server and the database (as relation databases) and work with a collections. This is similar to tables in relational models.

6

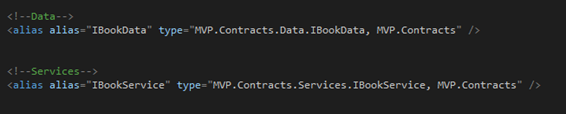
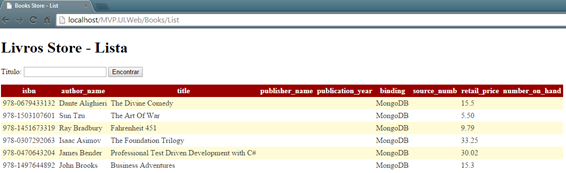
We have modify the Unity config file to map to this new library and now we are retrieving the data from MongoDB.

7

This post is only a little overview about how to start with Big Data and NoSql databases. Obviously MogoDB have more functionality and capabilities but this is a good point to start to test it and see how it works.

You can download the code here.

Unitary Tests


Probably you have Heard about Unitary Test but you don’t use it. It’s funny because when you talk about unitary test, everybody knows what are but noone use it… Under my point of view, this is an error. Unitary test allow us to test our application in few minutes and only with a click. Is useful to detect regression errors or error over different databases (if apply), countries, etc.

We are going to add unitary test to our MVP Project. The first step is create a unity test Project and after that we can start to create the methods to test every functionality of our application. We will use RhinoMocks framework, that allow us to test your MVP pattern. RhinoMocks create associations between our interfaces and  the implementations.

1

Now, we can create our test and use RhinoMocks to associate interfaces to his implementation. You can use Unity too but in my case i prefer put directly the implementation through RhinoMock because i can test several implementations for the same interface.

2

We have put the two implementations for our method, so depends which one we call we are going to test the Entity Framework or the list.

3

We have initialized our view through RhinoMocks too and we have used the E.F. service (we will have another one for the list). We call Find event and if we don’t get results we will launch an error). After that we retrieve the first element and we try to search by name. Again if we don’t have any result, we launch an error.

If we test it, we can see that the methods Works fine.

4

As you can image, only clicking or “Run All”, all test start to check and if one of them fails we will have an error. If we change some part of the code and we don’t have the expected results, probably we are going to get an error too (depends the implementation of the test), so is very useful to detect error in the entire application in an  easy way. We can test it at this level or method by method (Model, Service, Presenter, etc.).

You can download the code here.

Finishing, MVP + E.F. + I.O.C. + D.I.


End step in our Project. We will try to give more independency to each Project with Inversion of Control (IOC) and Dependency Injection (DI). What are these two concepts and his benefits?

I.O.C. Commonly, in the normal workflow, our code calls an specific method in a library. In IOC, we call a generic interface that returns an expected response, but the responsibility to know what method needs to call is from an external source. Sometimes this implementation is called “Hollywood Principle” due to the common phrase “Don’t call us, we call you”.

D.I. This pattern is used with IOC models to supply the implementations of the methods dynamically instead call the method directly like in the normal flow. D.I. is who manage the relation between the interfaces used in IOC with his implementation.

Ok, after the theory, is time to implement that.

How to start? The first step is start with IOC, creating the interfaces for our methods. We are going to separate the Contracts in 3, “Views”, “Services” and “Data”.

The first one is for our views, the second for the services (that are called from presenters and calls data) and the data (that has the communication with our database). The objective is not call the methods directly, all calls should be through interface.

We have created and interface for data with our method and we have inherited from it in our Data Access repositories.

1

Now we need to create a service that is the responsible to call this methods (always through the interface. We cannot call the methods directly). We need to create a project to put the services (or we can call the data layer directly from the presenter, but is recommended to have an intermediate layer).

2

We need to have a variable with our Repository (always through the interface) and call the methods of our interface (not the class directly as in a common x-layer design). We need to initialize it in our constructor as you can see in the image. We can have more than one repository in our services layer.

The end step is to replace our call in the presenter for our service layer. Again we will need a variable of our service layer that should be initialized in the constructor.

3

Now, we have implemented IOC, we have not called any method because we are delegated this to the interfaces. Doing this, we cannot know, who or how the method will be resolved.

Probably you are thinking, “How I know that I’m calling the right method? Which method are calling?” Solve this is the responsibility of D.I. Our D.I. manage the “routing” of the methods to call. We have chosen Unity, that is the D.I. proposed by Microsoft.

To install Unity we can use Nuget.

4

Ok, the first step is configure it. I prefer to configure it through xml because is more flexible than by code (we can change it at runtime and we don’t need to compile it and deliver a new version). We have created a file to put the configuration (UnityConfigFile.config).

By one hand we need to put our interfaces registering an alias.

5

By the other hand we need to specify which class (that implements this interfaces) will be used.

6

Finally we need to initialize the Unity Provider in our global.asax. We have created a class called InjectionProvider to register Unity. You can copy/paste it in your Project to use it.

7

And we need to create the presenter in the view through InjectionProvider.

8

Maybe you can have an error (The type name or alias MVP.Model.BookRepositoryEf, MVP.Model could not be resolved. Please check your configuration file and verify this type name.). This error is due to the libraries. You don’t have any reference to your “Model” and “Service” Project, so Unity cannot find it, you need to add your dll to the bin folder. You can do it manually or with post-build events.

Now our methods are managed by the D.I., so if we want to change how the application works, we only need to change the xml file. You can do the test changing the data Access layer (we have both, one with E.F. and another one with a static list) and you will see that the functionality of your application changes only changing a xml file.

9

You need to think that now you have small blocks (classes that implement interfaces) and you can connect this classes dynamically. You can think in the teleoperators of last century with his cables connecting the class dynamically depending who calls.

10

For WinForms and WPF you need to do the same. Add Unity, include the InjectionProvieder, call the initializer and create the presenter in the view trough Unity.

You can download the code here.

Multi Language Applications – Localizations


This is the last post about improvements to our applications, the multi language.

Sometimes, our application needs to be in different languages. For do that, .not bring us the possibility to have different resource files and choose between them. I always recommend use it, even if the application is in one language only because maybe in the future we can translate it and, if we don’t have use it resources, the work can be very huge.

We are going to create a new Project with the resources to be able to shared between the three UI projects. We need to add one for each language like the image.

1

As you can see, one is the main (we will use the names of properties in this file) and additional resources for the other languages (french, spanish and portuguese).

2

In the applications, we need to put the resources property instead put the word directly.

3

To test it, we can add a globalization parameter to change easily the language or we can manage it through the application, depending the selection of the language, the user, etc.

4

For Desktop applications we can use the same methodology. We only need to specify the resource to use in the “Designer.cs” file and again, choose the language to use.

5

And the same for WPF applications.

6

You can download the code of this post and the previous (E.F. + routes) here.

Adding Entity Framework


In this post, we will talking about some improvements to do in our application. We will introduce E.F. That don’t have nothing to see with MVP pattern but we will use the Project of the previous post about MVP. In any case, you can apply this improvements in other projects.

The first step is create the database. In our case a book store database.

1

After create the database, we need to create a ADO.NET Entity Data Model

2

We follow the instructions and we can select the objects to import (Table, Views, procedures, …). In our case we are going to select the tables (we can add, remove, update later).

3

In our Diagram, and if we don’t have the foreign keys in the database or we want to add additional associations in the model, we can do it through the Diagram. To do it, we need to select one entity > Add new > Association.

4

After that, we select the relation (the line) and we need to specify the fields of the relation.

5

After finish the associations, our model should be something like that:

6

Next step is separate our entities. By default, the entities are been created in the same folder and Project than our model. This not respect the X-Layer design, so we should have the entities in another Project. Do that is very easy from versión 5.X of Entity framework. We only need to move the “.tt” file to the Entities Project.

7

When we have the file in the other Project, we need to change the file to put where are located the model in the the inputFile variable.

8

If all Works fine, we can see that our classes are been created in this new Project. Now we have all separated, so we can continue. We need to take into account that if we modify something from our Model, we need to come to this file and make some modification (or only save again) to reload the changes in this file.

We have created a new class to connect to E.F. and retrieve data

9

Now we only need to change our presenter to call this class instead the previous one and change the data source. (We have removed the old Book entity and replace by the new one of E.F.). Probably we are going to get an error trying to connect, due to the local database (“Error finding books. No connection string named ‘BookStoreEntities’ could be found in the application config file.”). We need to add the connection to the Project config file (we can see it in the Model Project) and add the EntityFramework library (EntityFramework.SqlServer.dll).

We can see that now, the result are retrieved from the database.

10

Advanced Oracle UDT


In the last post we saw how to call procedures with simple UDT types (with one field of basic oracle types), but, what happen with complex types defined in oracle? We can use them to pass or return data of this type to Oracle or .net? Obviously the answer is yes. In this post we are going to see how to do it.

The first step is create our “row”. To do it, we need to create an object with the definition of the “columns”. After that we need to create a table of this new object.

1

As parameter of the procedure, we need to declare the table. As we use the table as parameter we can access directly instead to fill it, etc.

1.1

Ok, now the database side is done. Now we need to program the .net part. The first step is do the mapping between our .net “row” and oracle “row”. We need to inherit from TypeTemplate and decore our properties with the name of the property in the oracle “row field”.

2

At this point, we have our equivalence between oracle “row” and .net “row”. So now we need the equivalence of the “table”. Firstly we need to declare the “row”, because we only have defined the “content” of the row. To declare the row we need to inherit from TypeFactoryTemplate of our row content, and for the table inherits from TableFactoryTemplate of UDT_Table of this new row. That’s can sound difficult but is very easy as you can see in the image.

3

Now we have all the mapping so it’s time to call the database. As you can until now is easy to implement due to the implemented code in the classes that we use to inherit. We have developed this classes to facilitate the work. Like in the previous mail, you can download the libraries and use it in your project.

Returning to the .net part, we need to create our table: UDT_Table. In the property Value of the table we need to fill it with an array of OurRowClass with the data that we want to send to database. That’s all. We call the procedure and in our OracleParameter we need to specify the UdtTypeName (our table type in oracle) and the table as parameter.

4

You can download the code here.

Note: We have modified the library to allow complex types and we have reorganized the classes in different namespaces. Now we have OracleParameterBinding.Simple (for simple parameters. The commented in the previous post) and OracleParameterBinding.Complex (complex types), so you can migrate from one version to this new version without problem.

Oracle UDT


Have you ever been passed a list of parameters to Oracle Procedure? Some people use arrays to pass list of parameters to the procedures but Oracle has a more powerful option to do this, the UDT types (User Define Types). In this post we are to see a basic example to do this.

Currently, if you want to do this, the first step is to create an array as IN parameters, create a table with the same type that the elements into the array, fill this table and use it in the query. In .net you need to pass the array as value of the OracleParameter:

create or replace TYPE LIST_ITEM_STRING IS TABLE OF VARCHAR2(20);

1

2

There are another way to do this more directly. We will use the UDT types. In this case we can use the table directly instead use an array and fill the table in the procedure.

3

In .net part we need to assign the type used for the table, in our case the type defined above (HR.LIST_ITEM_STRING). Here the type would be Object and the value a “TableTemplate” of string.

4

We need to define the UDT type too:

5

OracleParameterBinding: We need to do the mapping between Oracle and .Net (read and write). This can be a little dificult to implement, in fact, a lot of documentation that i have read about that is a hell. We have created this library to do it more easy. As you can see your value only need to be an array of TableTemplate and that’s it. Easy, right? Feel free to use the library in your projects if you want, the library is included in the source code bellow. In addition, you can contribute with our paypal account ;).

You can download the code here.

Get Inserted or Updated rows with Merge in Oracle


Sometimes when we need to insert values in a table from a select, some of the rows can exists or not in the new table. In this case maybe we need to update or insert in the table. The sentence merge help us to do that:

MERGE <hint> INTO <table_name>
USING <table_view_or_query>
ON (<condition>)
WHEN MATCHED THEN <update_clause>
DELETE <where_clause>
WHEN NOT MATCHED THEN <insert_clause>
[LOG ERRORS <log_errors_clause> <reject limit <integer | unlimited>];

You can see the entire documentation in the oracle docs here.


Unfortunatelly one of the biggest inconvenients of merge is that we don’t know which registers are been inserted and which are been updated. In Sql Server we have the “OUTPUT” clause to retrieve these values but in Oracle this clause does’t exists. So we will try to make something similar to this behaviour. Reviewing the idea posted by Adrian Billington in his article, I have created an improvement to be able to know which values are been updated or inserted, how many, etc.

We will have 2 procedures, one for initialize and another to reset and 3 functions (store, get total and get values).

CREATE OR REPLACE PACKAGE MergeOptions AS

   PROCEDURE Initialize(v_num in integer);

   Function GetCount(v_num in integer) RETURN NUMBER;
   Function SetValue(v_num in integer, merge_val_in IN varchar2) return varchar2;
   Function GetValues(v_num in integer) return varchar2;

   PROCEDURE Reset;

END MergeOptions;

The idea is store the values instead of the counters as Adrian post and be able to store the values that we want (inserted, updated, deleted or multiple values).
We will have an array (the size depends how many values we want) with the values:

  type typ is record(val varchar2(32767));
  type tab is table of typ;
  array_t tab := tab();

And the procedures to manage this values:

PROCEDURE Initialize(v_num in integer) is
  begin
    array_t.extend(v_num);
end Initialize;
PROCEDURE Reset is
  begin
    array_t := tab();
end Reset;
Function GetCount(v_num in integer) 
    RETURN NUMBER is
    total number := 0;
  begin

    select nvl(max(rownum), 0)
      into total
      from (SELECT TRIM(REGEXP_SUBSTR(array_t(v_num).val, '[^;]+', 1, LEVEL)) AS UpdatedRows
              FROM DUAL
            CONNECT BY TRIM(REGEXP_SUBSTR(array_t(v_num).val,
                                          '[^;]+',
                                          1,
                                          LEVEL)) IS NOT NULL) V
     where V.UPdatedRows is not null;

    return total;
end GetCount;
Function SetValue(v_num in integer, merge_val_in IN varchar2)
    return varchar2 is
  begin
    array_t(v_num).val := array_t(v_num).val || merge_val_in || ';';
    return merge_val_in;
end SetValue;
Function GetValues(v_num in integer) 
    return varchar2 is
  begin
    return array_t(v_num).val;
end GetValues;

This solution is available only for versions greater or equal to 10g. If you are using previous versions you should replace function GetCount to find how many times appear “;” for example.

Ok. Now is time to test it:

declare 

begin

  Mergeoptions2.Initialize(2);

  Merge into ships S
  using (select * from NewShips) NS
  on (S.SHIPGUID = NS.Shipguid)
  when matched then
    update set S.LENGTH = NS.Length,
               S.NAME = case Mergeoptions.SetValue(1, S.Shipguid) when null then S.NAME else S.NAME end
  when not matched then
    insert
      (SHIPGUID, Name, Class, Length)
    values
      (Mergeoptions.SetValue(2, sys_guid()), NS.Name, NS.Class, NS.Length);

  dbms_output.put_line('You have inserted ' || Mergeoptions.GetCount(1) || ' values. The values are: ' || Mergeoptions.GetValues(1));
  dbms_output.put_line('You have updated ' || Mergeoptions.GetCount(2) || ' values. The values are: ' || Mergeoptions.GetValues(2));

end;

We want to know the Guid provided by oracle so we “keep” the guid when we insert the value in the merge. The problem here is, what happend with update? Guid is part of the on clause so we cannot update this value. We update another value with himself but calling the setvalue function to keep the data desired, so our value is registered in the array.

The final result is:

You have inserted 2 values. The values are: F0823C41AD74F038E0430A1FE534F038;F0823C41AD75F038E0430A1FE534F038;
You have updated 4 values. The values are: F0839C11332330DCE0430A1FE53430DC;F0839C11332430DCE0430A1FE53430DC;F0839C11332530DCE0430A1FE53430DC;F0839C11332630DCE0430A1FE53430DC;

Now we know how many rows are inserted and updated and the primary keys provides by the database. We can use this method to get other values, etc.

You can download the example here.